Easily Make Google Gadgets without Coding
For those of you who wish to create Google Gadgets for Blog Publicity without having to resort to any coding at all Google has provided a simple point and click interface. You can create several types of Google Gadgets here :
1. Framed Photo. : Share your photos.
2. GoogleGram : Daily Message of Love.
3. Daily Me : Share your day's quotes, links, and ideas with everyone in your life.
4. Free Form : All-purpose gadget that lets you meld text and image in any way.
5. YouTube Channel : Create a video channel for your friends.
6. Personal List : With this gadget you can publish your own personal "Top Ten" lists.
7. Countdown : Share a countdown to an upcoming event.
We will use the Free Form Google Gadget to create a Blog Publicity Gadget and submit it to the Google Directory...........
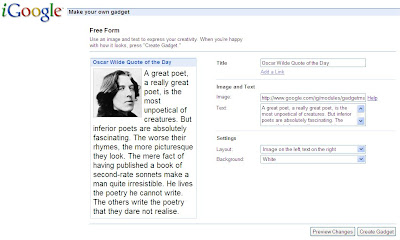
This is a very simple method to create a Blog Publicity Google Gadget for your blog which does not involve any coding at all. To do this just head over to Google's page to make your own Gadget. Click on the 'Get Started' link under the Free Form gadget. This opens the point-and-click interface where you can preview the gadget while making it. See picture below :

Since we wish to make a Blog Publicity Gadget enter the title of your blog and paste the link of your blog by clicking on 'Add Link' link below the title text box.
Then take a screenshot of your blog. You can do this by opening your blog in the browser and switching to Full Screen view. Then press PrtScr (Print Screen) key on the keyboard to copy the screen to the Windows Clipboard. Open your Paint program or use Irfanview which is a free graphics editor. Use Edit---->Paste to paste the image from your Clipboard and save it as a JPG file after resizing it. Upload this file to Photobucket or to Googlepages and copy down it's link. Paste this link of your blog screenshot in the textbox under Image and Text. For Text type in a description of your blog. Click Preview to see the change.
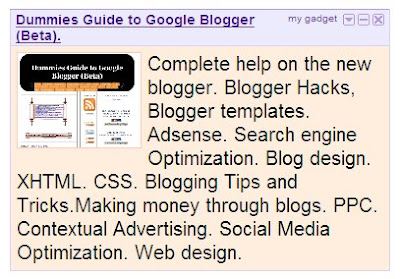
Under Settings you can change the color of the background and position of the image. Once you have previewed and approved all changes click Create Gadget button at the bottom and Voila! there is your brand new Google Gadget without any coding. In the next step you can enter email addresses of your friends to send them the gadget or skip this step for now. Then you can choose to publish the gadget to the Directory. Next enter your name, location and description of your gadget (all optional) and click Next and the gadget is instantly added to your iGoogle personalized page. See picture below of my Gadget :

The Google Gadget will be available in the directory in ten days. You can use this type of gadget and other types to create any type of gadget without any coding.
Google Gadgets can be added to blog posts as well, unlike Blogger Widgets which can only be added to other parts of the blog.
You can convert Google Gadgets so that they can be added to the Windows Vista Sidebar and he Mac OS X Dashboard. See : Google Code - Updates: Convert Google Gadgets to Other Widget Platforms.
1. Framed Photo. : Share your photos.
2. GoogleGram : Daily Message of Love.
3. Daily Me : Share your day's quotes, links, and ideas with everyone in your life.
4. Free Form : All-purpose gadget that lets you meld text and image in any way.
5. YouTube Channel : Create a video channel for your friends.
6. Personal List : With this gadget you can publish your own personal "Top Ten" lists.
7. Countdown : Share a countdown to an upcoming event.
We will use the Free Form Google Gadget to create a Blog Publicity Gadget and submit it to the Google Directory...........
BLOG PUBLICITY GOOGLE GADGET
This is a very simple method to create a Blog Publicity Google Gadget for your blog which does not involve any coding at all. To do this just head over to Google's page to make your own Gadget. Click on the 'Get Started' link under the Free Form gadget. This opens the point-and-click interface where you can preview the gadget while making it. See picture below :

Since we wish to make a Blog Publicity Gadget enter the title of your blog and paste the link of your blog by clicking on 'Add Link' link below the title text box.
Then take a screenshot of your blog. You can do this by opening your blog in the browser and switching to Full Screen view. Then press PrtScr (Print Screen) key on the keyboard to copy the screen to the Windows Clipboard. Open your Paint program or use Irfanview which is a free graphics editor. Use Edit---->Paste to paste the image from your Clipboard and save it as a JPG file after resizing it. Upload this file to Photobucket or to Googlepages and copy down it's link. Paste this link of your blog screenshot in the textbox under Image and Text. For Text type in a description of your blog. Click Preview to see the change.
Under Settings you can change the color of the background and position of the image. Once you have previewed and approved all changes click Create Gadget button at the bottom and Voila! there is your brand new Google Gadget without any coding. In the next step you can enter email addresses of your friends to send them the gadget or skip this step for now. Then you can choose to publish the gadget to the Directory. Next enter your name, location and description of your gadget (all optional) and click Next and the gadget is instantly added to your iGoogle personalized page. See picture below of my Gadget :

The Google Gadget will be available in the directory in ten days. You can use this type of gadget and other types to create any type of gadget without any coding.
Google Gadgets can be added to blog posts as well, unlike Blogger Widgets which can only be added to other parts of the blog.
You can convert Google Gadgets so that they can be added to the Windows Vista Sidebar and he Mac OS X Dashboard. See : Google Code - Updates: Convert Google Gadgets to Other Widget Platforms.
posted by Admin 2 @ 8:03 AM
0 Comments
![]()

0 Comments:
Post a Comment
Subscribe to Post Comments [Atom]
<< Home