Configuring a Dynadot's domain for a Blogger's blog
In the very beginning, this blog was published on blogspot.com. The original Blog*Spot Address was (is) ciipe-info.blogspot.com. At some point, I decided to publish this blog on my own domain and so I registered www.bceek.com at Dynadot.
After registering my domain, I needed to configure both my Blogger and Dynadot (DNS) settings. This is how:
Configuring Dynadot settings:
- Log into your Dynadot account using your username and password.
- Click the DOMAINS tab in the main menu. The main menu looks like this: SUMMARY | DOMAINS | SEARCH | WEB HOSTING | SSL | MY INFO| MESSAGES| MARKET PLACES| FORUMS.
- Mark the checkbox next to your domain name (in my case bceek.com) and then click the "Set Name Servers" button in the the "Domain settings" section.
- In the new page, make sure you are located in the DNS tab menu. The menu looks like this: NAME SERVERS | PARKING | FORWARDING | STEALTH FORWARDING | DYNADOT HOSTING | DNS | FREE HOSTING | EMAIL FORWARDING.
- In the "Domain Record" section: select "Forward" in the "Record Type" combobox and write http://www.yourdomainname.ext (in my case http://www.bceek.com) as your "IP Address or Target Host".
- In the "Subdomain Records" section: write www as your first "subdomain"; select "CNAME" in the "Record Type" combobox and write ghs.google.com as your first "IP Address or Target Host". This CNAME record value (ghs.google.com) is particular to Blogger...so, if your are NOT using Blogger your should use the corresponding CNAME record.
- Finally, click "Use Dynadot DNS" button.
Your setting should correspond to something like this:
After your Dynadot settings are set, expect a delay of one to three days, before all the DNS servers have been updated. I suggest that you wait this time before proceeding to configure the Blogger settings.
Configuring Blogger settings:
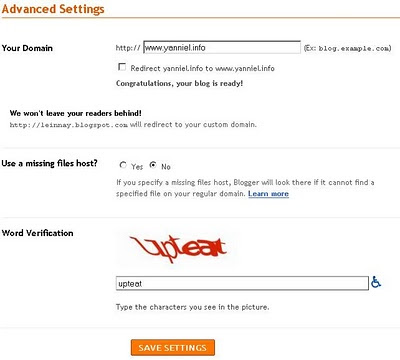
- Tell blogger to use your custom domain. For that go to: Dashboard-> Settings -> Publishing ---> Custom domain ---> Switch to advanced settings.
- Enter "Your Domain" name (in my case www.bceek.com) and the captcha "Word Verification".
- Finally, click the "Save Settings" button.
Well, this is all there is! Is your blog now alive in your custom domain? If it is, then I 'am happy ;-)


0 Comments:
Post a Comment
Subscribe to Post Comments [Atom]
<< Home